How to
Cite this model
Streffing, J., Sidorenko, D., Semmler, T., Zampieri, L., Scholz, P., Andres-Martinez, M., … Jung, T. (2022). AWI-CM3 coupled climate model: description and evaluation experiments for a prototype post-CMIP6 model. Geoscientific Model Development, 15 (16), 6399–6427. Retrieved from https://gmd.copernicus.org/articles/15/6399/2022/ doi: 10.5194/gmd-15-6399-2022
Measure which component is limiting the throughput of the coupled model
Coupled performance balancing can be performed with the oasis lucia tool. In the work folder where your experiment ran, execute $(model_install_dir)/awicm-3.1/oasis/util/lucia/lucia. When executing lucia for the first time, a fortran compiler needs to be available in the environment.
The output,
Component -         Calculations   -     Waiting time (s) - # cpl step :
fesom                    1616.47                 45.08          4377
oifs                     1263.30                397.72          4377
can be interpreted as such. Fesom spend nearly all it’s computing time on calculations, while oifs was waiting for about 1/4 of the time. Therefore fesom was the limiting factor on this specific setup. Take note, that having zero waiting time in all components is no achievable, since the length of timesteps varies throughout the run, depending on output and called physics packages. For example the radiation is called every 2 hours in OpenIFS making this timesteps longer than the non-radiation ones in between. Modern versions of lucia also provide solutions for optimizing with this imbalance in mind.
Change the number of OpenIFS processors between restarts
OpenIFS restart files (ICMSH, ICMGG, ICMGG INIUA) are tied to the processor decomposition used when they were written. If you want to change the number of OpenIFS MPI tasks (nproc) between restarts, you need to regenerate the initial condition files from GRIB output using the oifs_grib_output_to_restart.sh script provided in esm_tools/configs/components/oifs/.
Overview
The procedure works by converting GRIB model output back into the initial condition file format that OpenIFS expects. These are not true restart files (some information is lost), but the result is close enough for most applications.
Prerequisites
ecCodes must be available (
module load eccodeson most HPC systems). The toolsgrib_copyandgrib_filterare required.One day of GRIB output (not XIOS output) from the time step you want to restart from.
Step-by-step procedure
Produce GRIB output for the restart date. Restart the model from existing restart files, but configure it to run for only one day and set
LXIOS=falsein thefort.4namelist. This forces OpenIFS to write classical GRIB output files (ICMSH,ICMGG,ICMUA) instead of going through XIOS. You can set this through the esm-tools runscript:oifs: add_namelist_changes: fort.4: NAMCT0: LXIOS: false
Configure the conversion script. Copy the script
oifs_grib_output_to_restart.shfromesm_tools/configs/components/oifs/and edit the following variables at the top:# Path to the workdir containing the GRIB output files indir="/path/to/workdir/with/grib/output/" # The EXPID used in the file names, e.g. ICMGG<EXPID>+YYYYMM expid="ECE3" # Date string in the GRIB file name, e.g. "197901" for Jan 1979 indate="197901" # The exact date (YYYYMMDD) of the time step to extract # NOTE: There must be only one time step for this date in the file indate_cut="19790102" # Where the resulting initial condition files should be placed targetdir="/path/to/target/restart/directory/" # EXPID for the output files expid_tgt="ECE3"
Run the script. Execute the script on a login node or in an interactive session where ecCodes is available:
bash oifs_grib_output_to_restart.shThe script will:
Extract the selected date from the GRIB output using
grib_copySplit the data by variable and level using
grib_filterReassemble the fields in the specific order OpenIFS expects for initial conditions
Produce three files:
ICMGG<EXPID>INIT,ICMGG<EXPID>INIUA, andICMSH<EXPID>INIT
Update the esm-tools runscript. Change the number of OpenIFS processors to the desired value:
oifs:
    nproc: <new_number_of_processors>
Start the new simulation. Place the generated
ICM*files where esm-tools expects initial conditions and start the run withlresume: false(since these are initial condition files, not restart files). Make sure to set the correct start date matching the files you produced.
Note
This procedure does not produce a true bit-reproducible restart. Small differences may occur compared to a continuous run, but results are physically consistent.
Note
The script assumes 91 vertical model levels (L91) and the variable list of OpenIFS cy43r3. If you are using a different number of levels or cycle, you may need to adjust the level range and variable lists in the script.
Generate OASIS3MCT remapping weights for large grids (offline and MPI+OMP parallel)
Before you start, make sure that you:
Obtain the FESOM2 mesh and generate the mesh distribution you would like to use.
Use the ocp-tool to match the FESOM2 mesh to the atmosphere files (really just means cutting caspian out of the OIFS land sea mask)
Copy the ocp-tool modified OpenIFS input files, as well as the Oasis input files (areas.nc, grids.nc, masks.nc) and the runoff_mapper input files into the sub-directories of the pool dir that you use.
Steps towards the rmp_ files:
Generate FESOM2 mesh description file with SpheRlab
Link SpheRlab grid description file into ocp-tool2/fesom_mesh
Link OpenIFS ICMGG????INIT files into ocp-tools2/openifs_input_default
Run prep_fesom.sh
Install / load ocp-tools conda environment
Configure and run ocp_tool.py
Copy files from
ocp-tool2/output/oasis3_mct/inputandocp-tool2/output/openifs_input_modfiedback into the pool directoriesStart a coupled simulation with the desired FESOM2 mesh
dist. OIFSnprocmay be as small as minimum memory for loading the grid demands.Wait until the FESOM2 mesh information was added to the
areas.nc, grids.nc, masks.ncfiles.Wait until the BICUBIC remapping files have been generated. (they are much fast than the GAUSWGT ones, and this will cut the manual work in half later)
For small meshes you can also wait for the GAUSWGT remapping files to be created. For large meshes follow the next steps. This method is meant for Atmosphere-Ocean grid combinations in excess of ~1*10^12, where automatic weight generation on single cores becomes prohibitively time consuming.
Cancel the job allocation since generating the GAUSWGT
rmp_files would take days to months.Change the COUPLE path in
awicm-3.1/oasis/util/make_dir/make.${your_config}_Set the path to ${your_config} in
awicm-3.1/oasis/util/make_dir/make.inc_Go to
awicm-3.1/oasis/examples/test_interpolationAdd your
areas.nc, grids.nc, masks.ncfiles toawicm-3.1/oasis/examples/test_interpolation/data_frontiersModify the
awicm-3.1/oasis/examples/test_interpolation/run_frontiersinterp.shto add your machine, if it’s not included already.Extract the
GAUSWGTcouplings (FESOM->OIFS) from the namcouple in your work folder where you generated theBICUBICrmp_files.Create one namcouple for every remapping in direction at
awicm-3.1/oasis/examples/test_interpolation/data_frontiersFor an example, see:awicm-3.1/oasis/examples/test_interpolation/data_frontiers/namcouple_feom_A160_gauswgtConfigure awicm-3.1/oasis/examples/test_interpolation/run_frontiersinterp.sh to generate these remappings with MPI and OpenMP parallelization.
Generate the GAUSWGT remappings by starting
run_frontiersinterp.shon the batch queue.Copy all
rmp_files into the respective pool dir folder (e.g.input/oasis/cy43r3/{OIFS_RES}-${FESOM_RES}/${FESOM_DIST}).Start a day long coupled simulation with oasis
lresume=falseto generate oasis restart filesCopy oasis restart files into pool dir
Start full speed simulation with oasis
lresume=trueto generate oasis restart files
Select an SSP or RCP scenario
CMIP6
Control is possible through the namelist file fort.4. Inside you will find the namelist NAERAD, which contains the options for CMIP5 and CMIP6 greenhouse gas forcing. To activate CMIP6 forcing set the logic switch LCMIP6 = .true.. When NCMIPFIXYR is set to a value >0, it is interpreted as a fix forcing year. In the example below we use constant 1850 GHG forcing. If NCMIPFIXYR=0 the actual model year is used, and forcing changes from year to year. Note, that currently only greenhouse gases and solar radiation are set through this namelist. Work on the implementation of controllable anthopogenic aerosols is still ongoing (status: 30th of June 2022).
The recommended way to ensure the namelist changes are made conistently, is to use the add_namelist_changes from esm-tools.
&NAERAD
   LCMIP6 = .true.
   CMIP6DATADIR = 'PATH_TO_CMIP6_POOL'
   NCMIPFIXYR = 1850
   SSPNAME = 'historical'
Historic forcing is available for the years 1850 to 2014.
&NAERAD
   LCMIP6 = .true.
   CMIP6DATADIR = 'PATH_TO_CMIP6_POOL'
   NCMIPFIXYR = 0
   SSPNAME = 'historical'
Available SSPs are: SSP1-1.9, SSP1-2.6, SSP2-4.5, SSP3-7.0, SSP3-LowNTCF, SSP4-3.4, SSP4-6.0, SSP4-6.0, SSP5-3.4-OS, SSP5-8.5. Covered years are 2015 to 2100.
&NAERAD
   LCMIP6 = .true.
   CMIP6DATADIR = 'PATH_TO_CMIP6_POOL'
   NCMIPFIXYR = 0
   SSPNAME = 'SSP3-7.0'
The model also supports one percent increase per year and sudden four times incease of CO2 experiments through the additional logic switches L1PCTCO2 and LA4XCO2. The base value from which the the increase starts is set via NCMIPFIXYR.
&NAERAD
   LCMIP6 = .true.
   CMIP6DATADIR = 'PATH_TO_CMIP6_POOL'
   NCMIPFIXYR = 1850
   SSPNAME = 'historical'
   L1PCTCO2 = 'true'
For a more detailed look at the use of these forcing consult the source code file src/ifs/climate/updrgas.F90
CMIP5
Control is analogous to CMIP6 but we use LCMIP5, CMIP5DATADIR, and NRCP instead. Avaiable RCP are:
SELECT CASE (NRCP)
CASE (0)
  FILENAME='ghg_histo.txt'
CASE (1)
  FILENAME='ghg_rcp3PD.txt'
CASE (2)
  FILENAME='ghg_rcp45.txt'
CASE (3)
  FILENAME='ghg_rcp60.txt'
CASE (4)
  FILENAME='ghg_rcp85.txt'
For a more detailed look at the use of these forcing consult the source code file src/ifs/climate/updrgas.F90
Branch off from existing FESOM2 restart
In the esm_tools runscript yaml file, in the fesom section add:
fesom:
    lresume: true
    ini_parent_exp_id: "sp1950c"
    ini_parent_date: "${prev_date}"
    ini_restart_dir: "/work/ab0995/a270210/runtime/awicm3-v3.1_refactoring/TCO95L91-CORE2/sp1950c/restart/fesom"
    choose_general.run_number:
        1:
            lasttime:
                85200
            restart_in_sources:
                par_oce_restart: /${ini_restart_dir}/fesom.1949.oce.restart/*.nc
                par_ice_restart: /${ini_restart_dir}/fesom.1949.ice.restart/*.nc
Modify ini_parent_exp_id, ini_parent_date, ini_restart_dir, par_oce_restart, and par_ice_restart as needed for your use case. The variable lasttime is only needed when the FESOM2 timestep has changed between the old and new experiments. This could for example be the case for a spinup from a coldstart on medium and high resolution meshes. If you want to set lasttime, you can find the correct value to set it to, as the first number in the fesom.clock file of the previous experiment (e.g. <path-to-previous-experiment>/config/fesom/fesom.clock):
85200 365 1949
0.0000000000000 1 1950
Branch off from existing LPJGuess restart
In the esm_tools runscript yaml file, in the lpj_guess: section add:
Modify ini_parent_exp_id, ini_parent_date, ini_restart_dir, and state as needed for your use case.
Branch off from existing OpenIFS restart
In the esm_tools runscript yaml file, in the oifs section add:
oifs:
    lresume: true
    ini_restart_dir: "${general.ini_parent_dir}/restart/oifs/"
    ini_restart_exp_id: "${general.ini_parent_exp_id}"
    ini_restart_date: '1949-12-31T23:00:00'
    ini_pseudo_initial_date: "1949-12-01"
    prev_run_config_file: "${general.ini_parent_dir}/config/${general.ini_parent_exp_id}_finished_config.yaml_19491201-19491231"
Modify ini_restart_dir, ini_restart_exp_id, ini_restart_date, ini_pseudo_initial_date, and prev_run_config_file as needed for your use case. The ini_pseudo_initial_date should be set to one restart interval (e.g. 1 month or 1 year) before general.initial_date of the new experiment. This is used to trick OpenIFS into thinking it is always doing a short run, avoiding memory issues in long simulations.
Control Aerosol Scaling (AWI-CM3 v3.2 and v3.3)
Aerosol Scaling is a feature only available in AWI-CM3 v3.2 and above. For older versions it is not implemented (effectively deactivated). It is controlled via the fort.4 namelist parameter NAERANT_SCALE in the NAERAD namelist. By default it is set to 1 (activated). If activated, the default aerosol levels (which have an annual cycle that does not change over the years) are scaled according to the spatio-temporal field given in ifsdata/aerosol_scale_1850_2085_r2005.nc. This is supposed to model the anthropogenic influence on aerosol levels over time. For running paleo-simulations one might want to deactivate this. This is best done via an entry in the esm-tools runscript:
oifs:
    add_namelist_changes:
        fort.4:
            NAERAD:
                NAERANT_SCALE: 0
For a more detailed look, consult the source code files, e.g. src/ifs/phys_ec/su_aer_scalefactor.F90
Change the number of vertical levels for pressure level output of OpenIFS
Output in controlled via XIOS. The pressure levels onto which the data is interpolated from model levels is set in axis_def.xml. In principle two options exist. Changing the number of levels for all 3D pressue level output fields and changing the number of levels only for some output fields.
For all fields
To change the number of layers for all 3D pressure level fields, in axis_def.xml in section <axis_group id="pl_axes" ...>
modify n_glo="19" to the new number of layers, value="(0,18) to 0 nlayers-1 and subequently list the pressure levels in Pa.
For select fields
For selective fitting, in the <axis id="pressure_levels_zoom" section, you can make a sub-selection of the levels previously defined in the <axis id="pressure_levels" section. In the existing example three layers are selected: <zoom_axis index="(0,2)[10 11 12]" />. To write a field on this reduced vertical domain you have to define a new grid in grid_def.xml, specifying as domain pressure_levels_zoom instead of pressure_levels. With this new grid you go to file_def.xml and define a new file (copy paste from pressure level output to pressure level output zoom, and select the new grid). Then you delete the variables that should not be written on all levels from the pressure level output and insert them at pressure level output zoom.
Control orbital parameters
The orbital parameters (eccentricity, obliquity, and longitude of perihelion) can be controlled through the namelist NAMORB inside the fort.4 file. For details of the implementation, consider looking at yomorb.F90 and su0phy.F90. Controllable orbital parameters are turned on with the logic switch: LCORBMD=true, which is turned off by default. There are then three modes with which the orbital parameters can be controlled.
Under
ORBMODE=variable_yearmode the orbital parameters are calculated according to Berger et al. 1978 for the current year of the simulation. This is the default. The calculation can be considered reliable within ~+-1 million years of the present.Under
ORBMODE=fixed_yearmode the orbital parameters are calculated according to Berger et al. 1978 for the fixed year set by the namelist variableORBIY. If you choose fixed year but set no year, the default is 1950.Under
fixed_parametersyou have manual control over the parametersORBECCEN,ORBOBLIQandORBMVELP. If you choose fixed parameters but set no parameters, the default ones are for 1950.
Example for manual control:
&NAMORB
   LCORBMD = true
   ORBMODE = 'fixed_parameters'
   ORBECCEN = 0.016715
   ORBOBLIQ = 23.4441
   ORBMVELP = 102.7
In order to have esm-tools create an openIFS namelist of that form one can adjust the simulation YAML. The following example would let openIFS compute top of the atmosphere insolation based on an LIG orbit whose parameters are as defined for PMIP4:
oifs:
    add_namelist_changes:
        fort.4:
            NAMORB:
                LCORBMD: TRUE
                ORBMODE: 'fixed_parameters'
                ORBECCEN: 0.039378
                ORBOBLIQ: 24.040
                ORBMVELP: 275.41
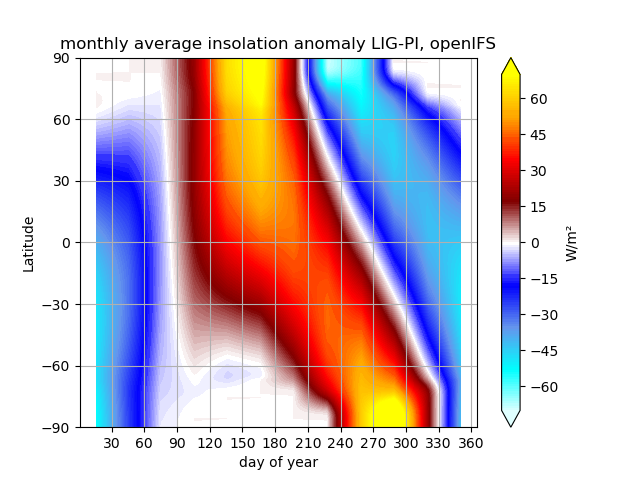
The resulting anomaly of top of the atmosphere insolation shows the expected anomalies across latitudes over time:
Comparison of PI (1850) insolation for various relevant models
Differences between ECHAM6 and openIFS generated insolation can be deemed negligibly small. There is an overall offset of both ECHAM6 and openIFS with respect to the insolation computed from the PMIP4 PI orbit settings - that question may deserve further investigation. Note that ECHAM6 computes their modern insolation based on an internal orbit solution, i.e. the orbital parameters are never explicitly provided to the model as a forcing.
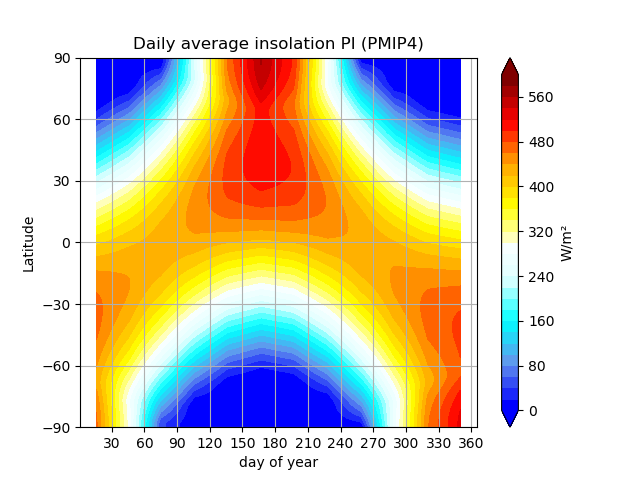
Insolation based on PMIP4 orbital parameters, computed based on climlab.

OpenIFS computed PI insolation, monthly means.
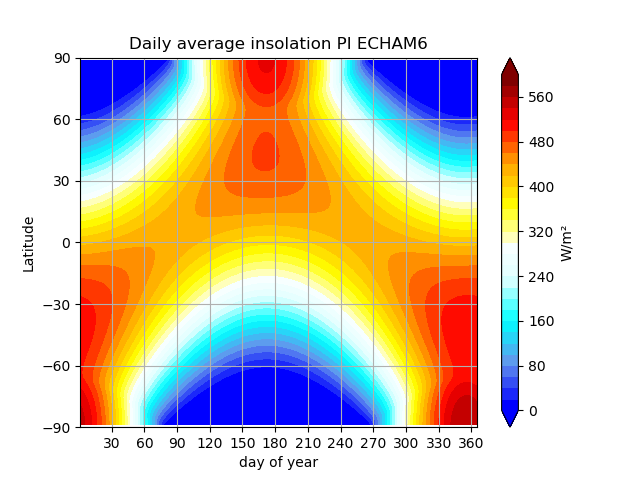
ECHAM6 computed PI insolation, daily means.
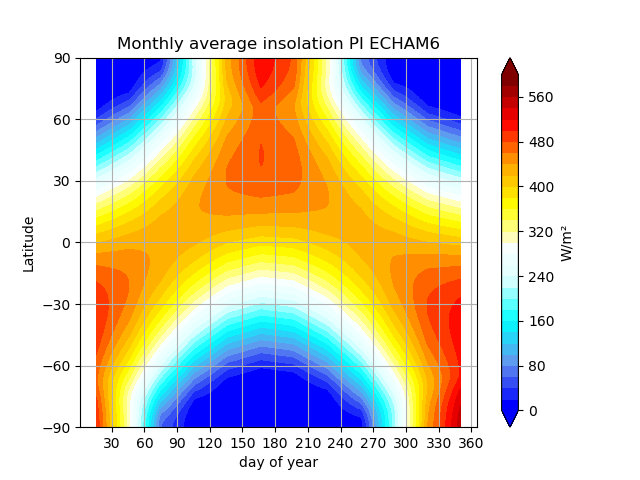
ECHAM6 computed PI insolation, monthly means, interpolated to openIFS grid.
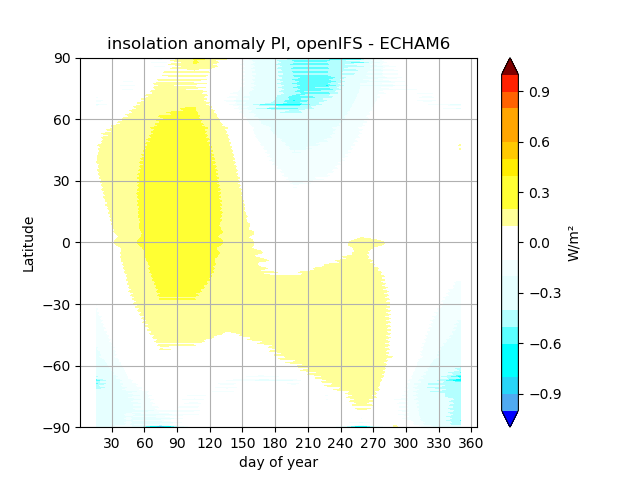
Anomaly of PI insolation, openIFS minus ECHAM6.
Files towards generation of the plots above are available in source/releases/3.1/.
Use debug flags
In case your model setup produces a segmentation fault it can be helpful to compile and run the model with debug flags. These can be set separatly for different executables in the coupled system. Here we mostly point you towards the locations that need to be modified in order to use debug flags. A comprehensive overview on which flags might help can be found at: https://doku.lrz.de/comparison-of-compiler-options-intel-vs-pgi-vs-gcc-11481685.html#ComparisonofCompilerOptions(intelvs.pgivs.gcc)-Diagnostics,RuntimeCheckingandDebugging
OpenIFS cy43r3 (AWI-CM3 v3.2 and below)
You can replace the OpenIFS Fortran compile and linker flags through esm_tools under esm_tools/configs/components/oifs/oifs.env.yaml by modifying OIFS_FFLAGS. E.g:
oifs:
   compiletime_environment_changes:
      levante:
         add_export_vars:
            OIFS_FFLAGS: '"-r8 -fp-model precise -align array32byte -O3 -qopenmp -g -traceback -convert big_endian -march=core-avx2 -mtune=core-avx2"'
Make sure you pick the right HPC system and use flags that fit to the compiler which is being used (see compiletime log output).
OpenIFS cy48r1 (AWI-CM3 v3.3 and above)
TBA.
for FESOM2
For FESOM2 it is currenty neccessary to modify the compiler settings in the source code folder inside the file awicm3-v3.2/fesom-2.5/src/CMakeLists.txt. The exact path my vary with your model version. You will find inside a block with different FORTRAN flags depending on compiler Inter/GNU/Cray/NVHPC, on whether FESOM2 is build as a library or executable, and sometimes on HPC system:
if(${CMAKE_Fortran_COMPILER_ID} STREQUAL  Intel )
   if(${BUILD_FESOM_AS_LIBRARY})
        target_compile_options(${PROJECT_NAME} PRIVATE -r8 -i4 -fp-model precise -no-prec-div -no-prec-sqrt -fimf-use-svml -xHost -ip -init=zero -no-wrap-margin -fpe0) # add -fpe0 for RAPS environment
   else()
        target_compile_options(${PROJECT_NAME} PRIVATE -r8 -i4 -fp-model precise -no-prec-div -no-prec-sqrt -fimf-use-svml -ip -init=zero -no-wrap-margin)
   endif()
   if(${FESOM_PLATFORM_STRATEGY} STREQUAL  levante.dkrz.de )
      target_compile_options(${PROJECT_NAME} PRIVATE -march=core-avx2 -mtune=core-avx2)
   elseif(${FESOM_PLATFORM_STRATEGY} STREQUAL  albedo)
      target_compile_options(${PROJECT_NAME} PRIVATE -march=core-avx2 -O3 -ip -fPIC -qopt-malloc-options=2 -qopt-prefetch=5 -unroll-aggressive) #NEC mpi option
   else()
      target_compile_options(${PROJECT_NAME} PRIVATE -xHost)
   endif()
#    target_compile_options(${PROJECT_NAME} PRIVATE -g -traceback ) #-check all,noarg_temp_created,bounds,uninit ) #-ftrapuv ) #-init=zero)
#    target_compile_options(${PROJECT_NAME} PRIVATE -qopenmp -r8 -i4 -fp-model precise -no-prec-div -no-prec-sqrt -fimf-use-svml -xHost -ip -g -traceback -check all,noarg_temp_created,bounds,uninit ) #-ftrapuv ) #-init=zero)
#    target_compile_options(${PROJECT_NAME} PRIVATE -r8 -i4 -fp-model precise -no-prec-div -no-prec-sqrt -fimf-use-svml -ip -g -traceback -check all,noarg_temp_created,bounds,uninit ) #-ftrapuv ) #-init=zero)

elseif(${CMAKE_Fortran_COMPILER_ID} STREQUAL  GNU )
#    target_compile_options(${PROJECT_NAME} PRIVATE -O3 -finit-local-zero  -finline-functions -fimplicit-none  -fdefault-real-8 -ffree-line-length-none)
   target_compile_options(${PROJECT_NAME} PRIVATE -O2 -g -ffloat-store -finit-local-zero  -finline-functions -fimplicit-none  -fdefault-real-8 -ffree-line-length-none)
   if(CMAKE_Fortran_COMPILER_VERSION VERSION_GREATER_EQUAL 10 )
      target_compile_options(${PROJECT_NAME} PRIVATE -fallow-argument-mismatch) # gfortran v10 is strict about erroneous API calls: "Rank mismatch between actual argument at (1) and actual argument at (2) (scalar and rank-1)"
   endif()
elseif(${CMAKE_Fortran_COMPILER_ID} STREQUAL Cray )
   if(${ENABLE_OPENMP})
      target_compile_options(${PROJECT_NAME} PRIVATE -c -emf -hbyteswapio -hflex_mp=conservative -hfp1 -hadd_paren -Ounroll0 -hipa0 -r am -s real64 -N 1023 -homp)
   else()
      target_compile_options(${PROJECT_NAME} PRIVATE -c -emf -hbyteswapio -hflex_mp=conservative -hfp1 -hadd_paren -Ounroll0 -hipa0 -r am -s real64 -N 1023 -hnoomp)
   endif()
elseif(${CMAKE_Fortran_COMPILER_ID} STREQUAL NVHPC )
   target_compile_definitions(${PROJECT_NAME} PRIVATE ENABLE_NVHPC_WORKAROUNDS)
   target_compile_options(${PROJECT_NAME} PRIVATE -fast -fastsse -O3 -Mallocatable=95 -Mr8 -pgf90libs)
   if(${ENABLE_OPENACC})
      # additional compiler settings
      target_compile_options(${PROJECT_NAME} PRIVATE -acc -ta=tesla:${NV_GPU_ARCH} -Minfo=accel)
      set(CMAKE_EXE_LINKER_FLAGS "-acc -ta=tesla:${NV_GPU_ARCH}")
   endif()
   if(${ENABLE_OPENMP})
      target_compile_options(${PROJECT_NAME} PRIVATE -Mipa=fast)
   else()
      target_compile_options(${PROJECT_NAME} PRIVATE -Mipa=fast,inline)
   endif()
endif()
In order to change the compiler settings you replace the target_compile_options that are currently used with the ones that you would like to have. Make sure you pick the right HPC system and use flags that fit to the compiler which is being used (see compiletime log output). Typical debug flags for e.g. Intel would be -g -traceback -check all,noarg_temp_created,bounds,uninit.
for XIOS
For the IO server debug flags can be set inside the xios source code folder at: awicm3-v3.2/xios/arch.fcm. The exact path may vary by model version. Here you want to add some of the DEV and DEBUG flags to the BASE flags for Fortran or C, as appropriate:
%BASE_CFLAGS    -std=c++11 -diag-disable 1125 -diag-disable 279 -D__XIOS_EXCEPTION
%PROD_CFLAGS    -O3 -D BOOST_DISABLE_ASSERTS -march=core-avx2 -mtune=core-avx2
%DEV_CFLAGS     -g -traceback
%DEBUG_CFLAGS   -DBZ_DEBUG -g -traceback -fno-inline

%BASE_FFLAGS    -D__NONE__
%PROD_FFLAGS    -O3 -march=core-avx2 -mtune=core-avx2
%DEV_FFLAGS     -g -O2 -traceback
%DEBUG_FFLAGS   -g -traceback